Here, experts from Stagestep Flooring Solutions share advice on building your own dance floor system for your studio.
Building your own dance floor system starts out with preparation, planning and asking the right questions. Do that, and the results will be a successful project, saving you time and money.
There are three elements to a dance floor system:
- The slab – your foundation
- The sub-floor – for energy absorption
- The dance floor – for a non-slip surface
There are many options to consider, both in what elements are required to meet your needs and how to put those elements together.
Questions you should ask yourself:
- How is the space going to be used? Just dance? Multipurpose? Parties and other non-dance activities?
- What style(s) of dance, and how often will the space be used?
- Is this a temporary, semi-permanent or permanent installation?
- What is your budget?
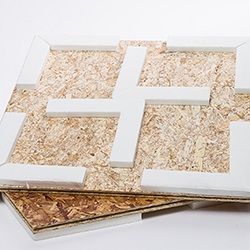
Springstep IV sub floor from Stagestep
In addition, you will need to decide whether you do it yourself from scratch, use a pre-fabricated system to install yourself, hire someone locally to install or have the manufacturer do it all for you.
Once the questions are asked and answered, you will have a blueprint for action. Whether you do it yourself or farm it out, you should be aware of the following, so no critical step is missed out.
The slab needs to be level and have a vapor barrier, especially if it is concrete. If it’s not level, you may need to have it skim coated.
The floating sub floor can come in many configurations. You will need to decide, based on function, installation instructions, budget and characteristics regarding resiliency and shock absorbency, which kind of sub floor is right for you. Make sure you get a floating subfloor as opposed to a raised subfloor. Floating means air under all surface points. Foam has air.
The dance floor surface can be vinyl (Marley-type) or wood. Within each category, there are many options based again on budget, appearance, use, maintenance schedule required and if the flooring ever needs to be moved (to a stage for a recital, for example).
Do not just jump in and make decisions without first exploring all your options, knowing your needs, talking with the “experts” and with other owners who have similar needs or have been through the process.
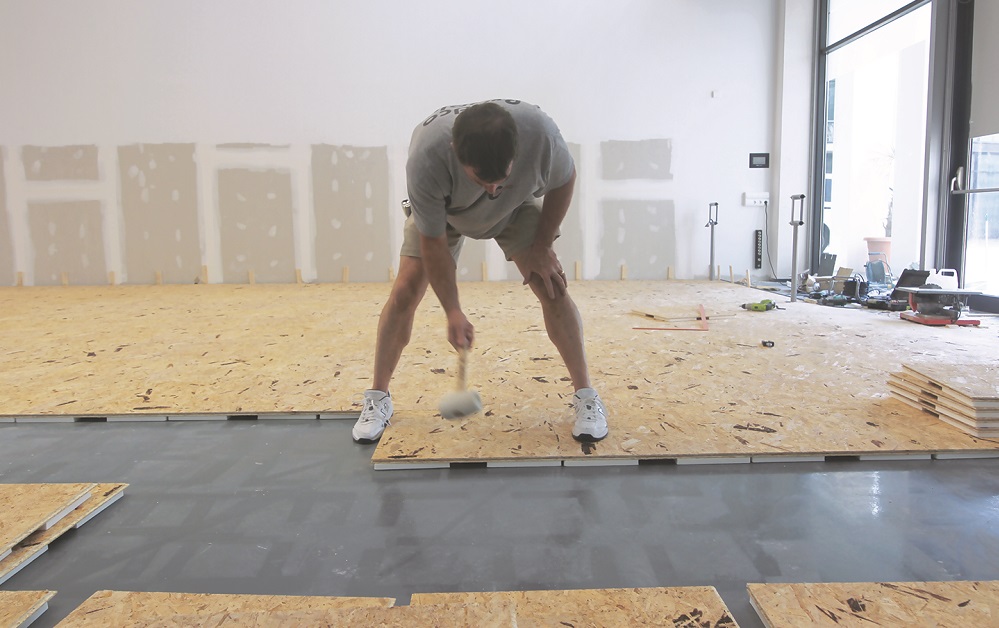
For the purpose of this tutorial, let’s say we are in a multi-dance use studio with a long-term lease (or we are the owners), and we have the ability to do it ourselves.
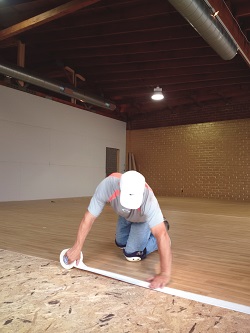
Installing a Woodstep dance floor from Stagestep.
First, we check out the slab. If it is uneven, broken in spots or otherwise not level, it will need to be repaired. If it is new construction, a moisture test should be conducted (called a “calcium chloride test”, which can be purchased at a hardware store) to check for the percentage of moisture and moisture pressure in the slab. The concrete slab then needs either a liquid or visquin vinyl sheeting vapor barrier. This is not hard to install or apply.
The basic all-purpose floating sub floor for multi-use dance activities is called Springstep II. The following elements are required:
- High density foam blocks or foam cubes (52-100 per bottom plywood sheet)
- 2 layers of ½ inch underlayment grade plywood – top layer to be A/C (finished on one side), bottom layer B/C (unfinished on both sides)
- 50-75 screws per top plywood sheet
- one-inch deck screws with thread running all the way up to the head
- wood putty
- sander
- electric screwdriver
- circular saw
- tape or adhesive to attach your flooring to the sub floor
Assuming you are going to install a Marley-type roll-out dance floor, you should always store your flooring prior to installation standing on end, rolled up around a cardboard or plastic core.
First step is to roll out over the flooring the sub floor, loosely for 24-48 hours so it can acclimatize. Always use an industrial cutting tool (not a box cutter) to trim the flooring.
There are four ways to install: temporary (top tape), semi-permanent (up to two years using double-faced 2” or 4” tape), long-term semi-permanent (ReUseIt 2.0), and permanent (adhesive). Professional installation is a must for permanent installs. Other options can be doing it yourself.
Directions are on available online at www.stagestep.com. They are straightforward and do not involve a great deal of skill. It will take time, but you can save up to $2.00 per square foot. Other options include Springstep IV, a pre-fabricated floating subfloor that eliminates screws, sanding and wood putty, and plywood. It will save you up to 80 percent in time to assemble.
Remember, preparation, planning and asking the right questions will result in a studio floor that is right for your students, your schedule and your budget.
Share this: